In the fast-paced world of pet care, effective communication is essential for providing excellent service. Time To Pet is committed to continuously improving its software based on customer feedback and feature requests, and one of the most highly requested enhancements: the ability to apply multiple message tags, automatic message tags, and advanced filtering. These new features allow you to categorize and filter messages effectively, streamline operations, and ensure that important communications are never overlooked. In this post, we'll explore how to utilize these new tools to their fullest potential, providing clarity on functionality and offer practical use cases tailored for pet care providers, Admins, and Office Managers.
The Value of Automatic Tagging
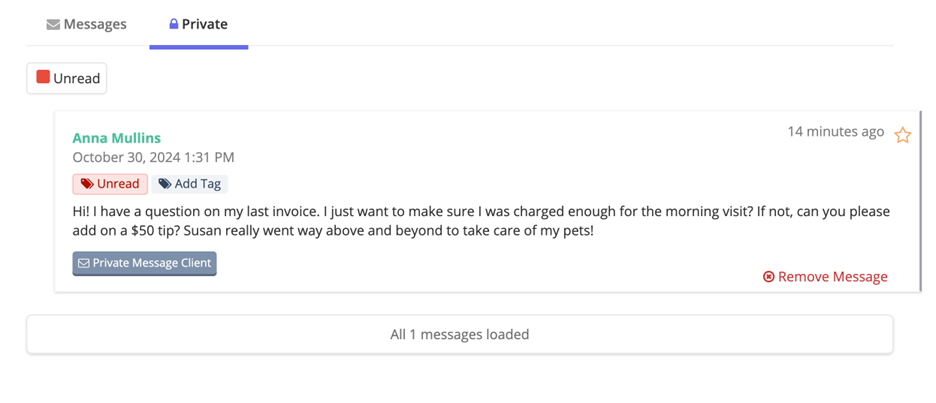
Automatic tagging allows you to organize the Message Center in a way that aligns with your company's workflow. By auto-tagging specific types of messages, you can maintain a clearer, more manageable inbox. For instance, if you want to use the Message Center similarly to a traditional inbox, consider automatically tagging messages as “Unread” or “Manager Needs To Review.” When you or another Admin or Office Manager has addressed the message, they can simply remove the tags, signaling to their team that the message has been read.
Key Features of the Message Tagging System
The new tagging system offers unlimited tags, which means you can customize them to suit your operational needs. However, understanding the difference between message tags and client and staff flags is crucial:
- Message Tags: These help track messages and the actions associated with them—whether they need to happen, have happened, or will happen. This ensures that messages are read and followed up by the right team members. Client and Staff message tags are completely customizable and an ulimited number of message tags can be applied to any message. Message tags are viewable on the Time To Pet web Dashboard (not the Mobile App) by Admins, Office Managers, and Staff.

- Client and Staff Flags: These allow you to quickly highlight essential information related to clients or staff members. Flags are visible at a glance throughout Time To Pet, including the Mobile App, whereas message tags are not visible in the Mobile App. The use cases for flags are vast, including managing service areas, highlighting special needs pets, and filtering reports.

Practical Use Cases for Automatic Tagging
Organizing Incoming Messages
Using tags strategically can help you stay on top of client communications:
• Auto-Tagging Incoming Messages: To streamline the tagging process for incoming messages, automatically apply an “Unread” tag to all private messages as they arrive. When reviewing these messages, if one is about invoicing, add both an “Invoice Question” and a “Needs Follow Up” tag. For all client messages, apply a “Needs Review” tag by default. After reading each message, either remove this tag or replace it with an appropriate action tag, such as “Ask For Review” or “Needs Profile Update.” This approach simplifies message organization and ensures that follow-ups are consistently prioritized.

-
Tracking Action Items: After reviewing a tagged message, you can simply remove the tag or replace it with “Completed” or “Waiting on Client Response.” This system helps in tracking the progress of each message’s action items.

Managing Team Communications
For teams with multiple office managers or admins working different shifts, effective communication is key. Here’s how to leverage Automatic Tagging:
- Create Specific Tags: Develop a tag such as “Manager Name Needs To Review” along with actionable tags like “Needs Action,” “Request Review From Client,” or “Follow Up With Client.”

-
Filtering by Message Tags: When each manager logs in, they can filter their Message Center by these tags, allowing them to see only the messages that require their attention. This facilitates easier handoffs between managers and admins at the start of new shifts.

Enhancing Client Relations
Message Tags can also help maintain strong client relationships:
-
Client Tips: When a client mentions they forgot to tip or requests to tip, use a “Needs Tip” message tag. This can be combined with a specific team member's name or a “Needs Action” flag to ensure no tips slip through the cracks. Similarly, if you have a Saved Reply for clients explaining Automatic Tipping and offering it to enable it for your client so they do not need to remember to tip in the future, you can add an “Automatic Tipping” message tag as a reminder to send that Saved Reply.
-
Follow-Up on Reviews: If you want to revisit clients for reviews, keep the “Review Requested” tag applied to messages until feedback is received. This method allows you to sort and track outstanding requests effectively. Take this a step further and add a “Review Left” client flag to the client’s profile, signaling they have already left a review.
Message Tag Ideas for Your Message Center
Here is a list of suggested tags that can help you optimize your workflow:
- Unread
- Read
- User Name To Review
- All Managers Review
- Any Manager Review
- Needs Action
- No Action Needed
- Request Review From Client
- Follow Up With Client
- Follow Up Call Requested
- Grooming Request
- Nail Trim Request
- Pet Profile Update Needed
- Client Profile Update Needed
- Request
- Complaint
- Invoicing
- Keys
- Card Failed
- Hold For Manager Review
- Waiting On Client Response
- Waiting On Staff Response
- Completed
- Closed Without Action
- See Private Note On Client Profile
- Sitter/Make Sure Sitter Name Reads This Message
- Referral
- Add Tip
- Send Automatic Tipping
- Make Inactive
- Event Note Needed
- Responded - Needs Review
- Client Love
- Special Request
- Urgent
- Left Hard Copy Of Instructions Need To Upload Notes
- VIP Client
Staff Message Tags
- Time Off/Availability
- Needs Coverage
- Needs Reassignment
- Urgent
For users of the Facility product, consider these additional tags:
- Check-in
- Late Check-out
- Extending Stay
- Injury/Altercation
- Pick Up Notes
- Drop Off Notes
- Update Run Card
Best Practices for Message Tags
Getting Set Up and Staying Organized
Here are some tips to get started with Automatic Message Tags and Multiple Message Tags:
- Read through the help documentation on setting up Automatic Message Tags
- Decide which tags will work best for your company. Add them to Message Tags settings.
- Decide which messages you would like automatically tagged. Set up Auto Tagging.
- Create any Standard Operating Procedures (SOPs) for yourself and your team as well as definitions for each message tag. While this needs to be created outside of Time To Pet, you can certainly add this as a Global Staff Document or add it individually to the team members who need access using the Documents tool.
- Implement! Now it’s time to put these tools to work. Try out different tags and workflows and see which ones work best for your company and make any adjustments as you find your flow!
Advanced Filtering
New Filtering Tools
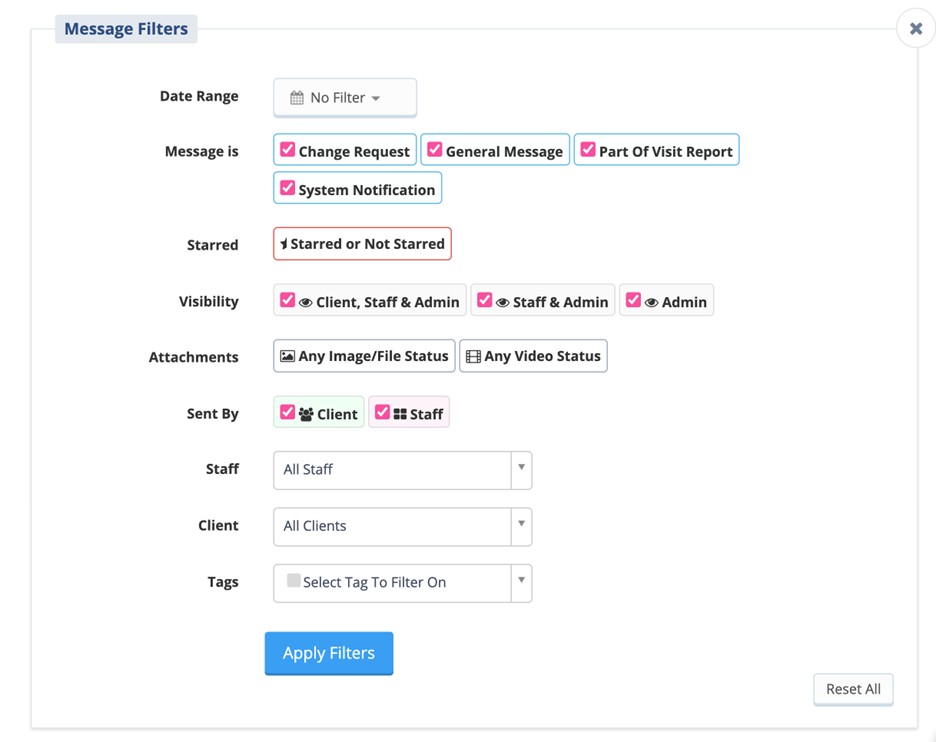
We’ve released a few new filter options to help organize your Message Center. These new filter options allow for the use of multiple tags, enhancing your ability to manage messages effectively.

One of the key features is the Date Range filter. By selecting "No Filter," you can remove any date restrictions, although you can also choose specific date ranges if needed. This is particularly useful if you want to focus on messages sent or received within a certain timeframe.
The Message Is filter offers several options, including Change Request, General Message, Part Of Visit Report, and System Notification. You can check the relevant message types you want to filter. For example, if you're only interested in system notifications, simply select that option.
Another useful feature is the Starred filter. This allows you to filter messages based on whether they have been marked as important (starred). Using this filter is beneficial when you want to focus on key messages that require attention.
The Visibility filter gives you control over who can see the messages. You can choose from options like Client, Staff & Admin, Staff & Admin, or Admin. For instance, if you want to view messages visible to all users, select "Client, Staff & Admin."
When it comes to Attachments, you have several options available, including Any Image/File Status, Any Video Status, Must Have Image/File, and Must Have Video. Utilizing these filters helps you find messages with specific types of attachments, such as images or videos. Remember, you can also view all client photos and videos and sort them by date and client in the Gallery!
The Sent By filter allows you to specify whether the messages are from a Client or a User. This flexibility enables you to focus on messages sent by the appropriate sender.
Additionally, the User filter shows messages from all users, but if you want to see messages from a specific user, you can select their name from the dropdown menu.
Similarly, the Client filter shows messages from all clients. You can filter messages by selecting specific clients if necessary.
Lastly, the Tags filter allows you to categorize messages based on the tags that have been applied to them, and this feature supports filtering on multiple tags, making it easier to organize and locate messages efficiently.
Applying Filters
To apply the filters effectively:
- Identify Your Objective: Determine what specific information or messages you need. For example, if you're looking for change requests from clients within a specific date range, select those options.
- Combine Filters: Use multiple filters to narrow down results. For example, you could filter for "General Messages" that are "Starred".
- Review Results: After applying the filters, review the messages that appear to ensure they align with your criteria. Adjust filters if necessary.
- Reset Filters: If you need to start over, use the Reset All button to clear all selections.
By carefully selecting the appropriate filters, you can streamline your message management process and find the information you need quickly and efficiently.
Conclusion
With these new features, keeping communication organized in pet care just got a whole lot easier. Using Automatic Tagging and advanced filtering, you can set up your Message Center to fit exactly what your team and clients need. Picture this: messages sorted, key action items tracked, and client relationships strengthened, all while making your day-to-day a breeze. The tagging system gives you the flexibility to create an ideal communication flow that truly works for you. As you try out these new tools, you’ll find plenty of ways to manage and prioritize messages so nothing slips through the cracks. There’s so much you can do here, and it’s all designed to help you run a more efficient, responsive, and client-focused business. So go ahead, dive in, play around with these tools, and see how they can take your communication game to the next level. Your team, and your clients, will thank you!

